What a custom entertainment unit involves and who it suits
Off-the-shelf entertainment units rarely match your wall exactly, and even fewer are designed around where your power points, aerial and network cabling actually sit. The result is usually a unit that is 200 mm too short for the wall, a TV that looks too big or too small above it, and a tangle of leads down the plasterboard.
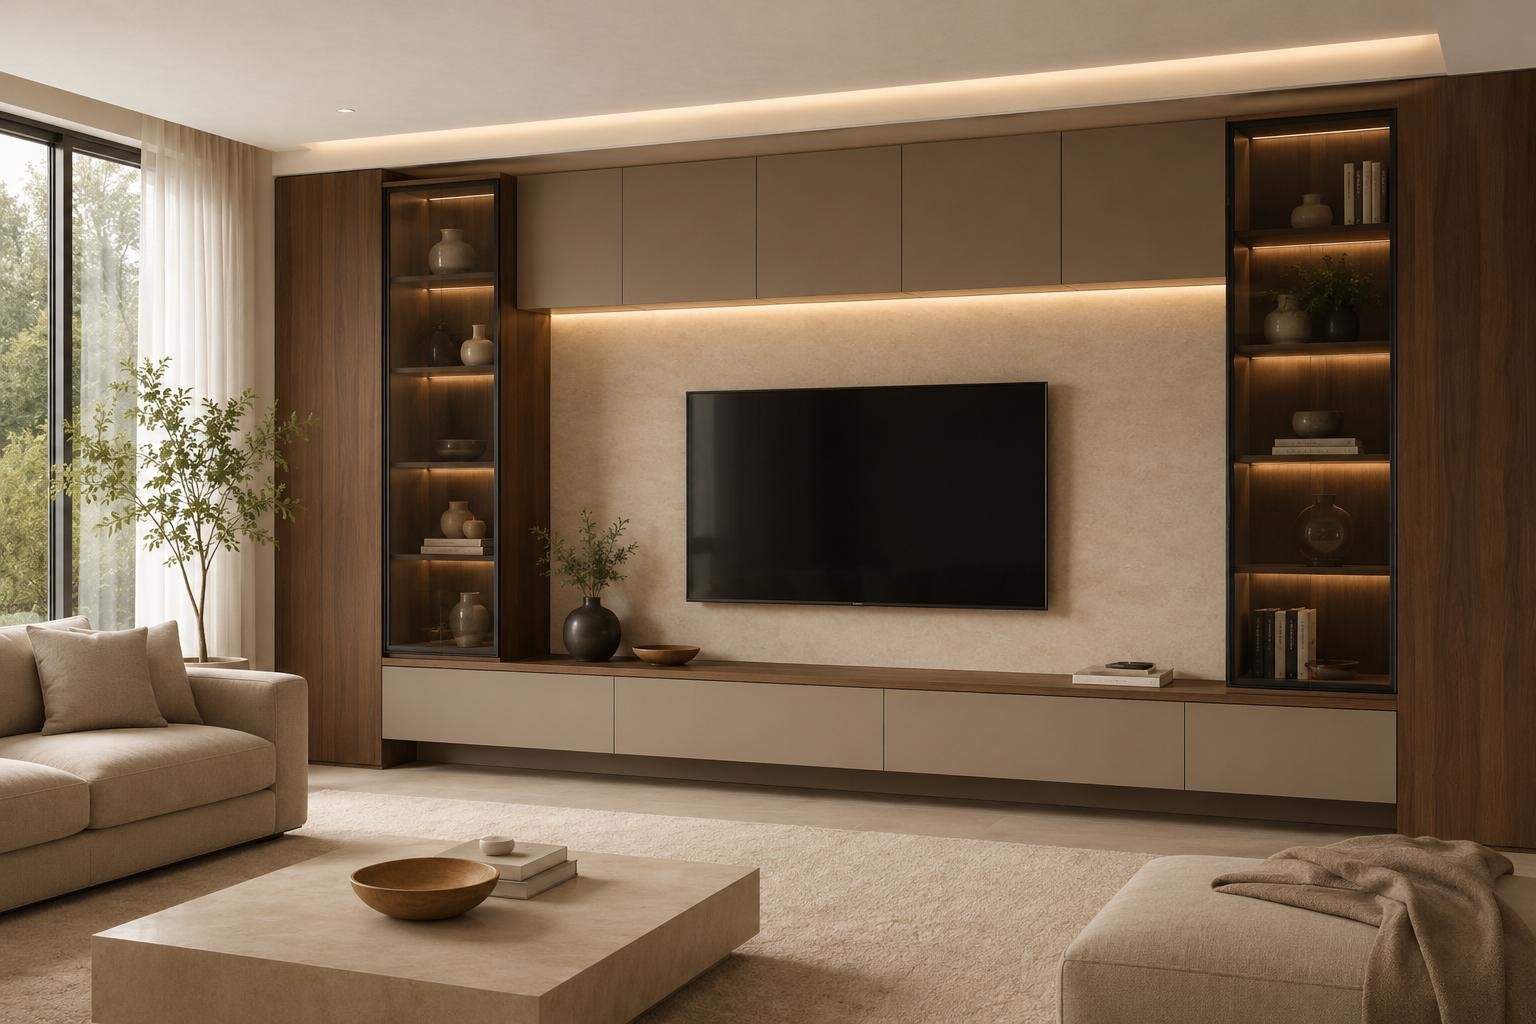
A custom entertainment unit is built to your wall width, your TV size and the storage you need for media equipment, gaming consoles, remotes, board games and everything else that ends up in the living room. Options run from a simple floating console to a full media wall with concealed cabling and display shelving. Either way it is designed and built as one piece for your room.
It suits living rooms with an awkward wall, a chimney breast or alcoves either side, families with a lot of gear to hide, and anyone who wants the TV wall to look like part of the house rather than a furniture purchase. It also pairs well with other custom cabinetry in the same room, such as a bar cabinet or bookshelves.
What is included
- In-home measure against your wall and TV or mounting position
- Cable management design for power, aerial and network
- Floating or full-height cabinetry layout
- Display shelving and concealed storage design
- Material and finish selection
- Manufacture in our own workshop
- Installation and final wall fixing
Entertainment unit styles we build
Floating media console
A low cabinet fixed to the wall with nothing touching the floor. It makes a room feel bigger, keeps the floor easy to clean and suits apartments and smaller living rooms. Drawers or flap doors hold consoles and remotes, and the TV is wall mounted above.
Full media wall
Floor-to-ceiling or wall-to-wall joinery with the TV set into a recessed panel or open bay, and cupboards, drawers and shelves around it. This is the option for people with a lot to store, or a wall that needs to be dealt with as a whole, such as one with a bulkhead or a window at one end.
Fluted or timber-slat feature
Vertical fluted panels or timber slats behind or around the TV add texture and warmth. They also hide cable access panels well. They are dust collectors, which is worth knowing before you commit to a full wall of them.
Backlit display shelving
Open shelves either side of the TV with integrated LED strip lighting, for books, art and objects. The lighting is wired in during manufacture and connected by your electrician.
Fireplace surround joinery
Joinery can be built around an existing fireplace or an electric fireplace insert, with the surround and storage made as one piece. Heat clearances follow the fireplace manufacturer's specification, which we build into the drawings. Gas fireplaces must be installed and connected by a licensed gas fitter, which we coordinate.
Materials and finishes
Carcasses are typically melamine or particleboard for value, with laminate, 2-pac or timber veneer doors. Fluted or slatted timber panels are available as a feature finish. Living room joinery is on show all day, so the finish choice matters more here than inside a wardrobe.
| Finish | Look | Durability | Cost level | Lead time |
|---|---|---|---|---|
| Laminate (Polytec, Laminex) | Solid colours and realistic woodgrains | Very good, resists knocks from kids and vacuums | Lower | Fastest |
| 2-pac polyurethane | Smooth sprayed colour, matt or satin | Good, can chip on edges | Mid to high | Longer (spray and cure) |
| Timber veneer | Real oak, walnut or other species | Good once lacquered, fades a little in direct sun | Mid to high | Longer |
| Fluted or slatted timber panel | Textured feature surface | Good, but collects dust in the grooves | Higher | Longer |
A dark matt 2-pac or a timber veneer suits a media wall because it reduces reflections around the screen. Gloss finishes look sharp in the showroom but pick up TV glare and fingerprints. If the unit faces a big north or west-facing window, veneer will change colour over time, as all timber does in sunlight.
Cable management, hardware and fixing
Cable routing is built into the carcass so power, aerial and network cables run inside the unit rather than trailing down the wall. We plan the path from the TV bracket to the equipment cupboard and on to the wall outlets before manufacture.
- A cable duct or conduit behind the TV panel, sized to take HDMI leads with their plugs on
- Routed channels and grommets through shelves and cabinet backs
- Removable back panels or access hatches so you can add or change equipment later
- Ventilation for AV receivers, consoles and set-top boxes, which run hot in closed cupboards
- IR-friendly door options, such as perforated or fabric panels, or an IR repeater, so remotes still work with doors closed
- Soft-close hinges, flap stays and drawer runners from Blum, Hettich or Häfele
Fixing to the wall
Floating units are fixed with concealed wall brackets rated for the unit's weight plus what goes in it. On plasterboard walls, that means fixing into studs or noggings, not just the plasterboard. On double brick or concrete, which is common in older Sydney homes and apartments, we use masonry anchors. If the wall is not strong enough, we may add a floor-mounted support hidden behind the kickboard.
Planning tips and common mistakes
- TV height. The centre of the screen should sit close to seated eye level, usually around 1,000 to 1,100 mm from the floor. Mounting the TV too high is the most common complaint we hear about media walls.
- Console height. Floating consoles are typically mounted with the top 400 to 550 mm off the floor, which leaves room for a soundbar between the unit and the screen.
- Depth. 400 to 450 mm suits most equipment. AV receivers need more depth once cables are plugged in, so measure them before we draw.
- Width. Allow the unit to extend well past the TV on each side. A console only slightly wider than the screen looks undersized.
- Future TVs. Screens keep getting bigger. Design the recess or panel for the next TV, not just the current one.
Power and data outlets should be positioned before manufacture: one set behind the TV and one inside the equipment cupboard. Moving outlets after the joinery is fixed is messy, so we give your electrician exact heights from the shop drawings. If you are also fitting out a study in the same area, home office joinery can share the same finishes.
How the process works
Consultation and measure
We measure the wall, confirm TV size and mounting position, and locate power and aerial points and wall construction.
Design and shop drawings
We prepare a 3D concept and shop drawings showing TV position, cable paths, storage and lighting.
Written, itemised quote
Every item is listed in writing, including materials, hardware, lighting, installation and GST.
Manufacture
Manufacture typically takes 3 to 5 weeks once the design is signed off. Laminate is quickest. 2-pac, veneer and fluted panels take longer.
Installation
Installation, including concealed wall fixing, is completed in a day for most floating consoles and media walls. Your electrician then connects lighting and any new outlets.
What an entertainment unit costs in Sydney
Most joiners publish nothing on price. Here is honest market context so you can plan and compare quotes fairly. These figures are indicative Sydney market context for 2026, not our prices. For wider budgets, see our cost guide.
| Scope | Indicative 2026 Sydney range |
|---|---|
| Floating media console | $3,500 to $7,000 |
| Full media wall with storage | $8,000 to $15,000+ |
What drives the price
- Size. A full-height wall uses far more board, hardware and finishing than a console.
- Finish. Laminate is the lower-cost option. 2-pac, veneer and fluted panels cost more.
- Lighting and electrical. Integrated LED shelving adds joinery cost plus electrician time.
- Fireplace work. Surrounds need heat-rated materials and clearances.
- Wall conditions. Out-of-square walls, bulkheads and masonry fixing add time on site.
Indicative 2026 Sydney market context only. Not a quote. Your actual cost depends on scope, size, materials, hardware and site conditions. We provide a written, itemised quote after a free consultation.
Media walls often sit alongside architectural joinery such as wall panelling or built-in window seats. You will find more living room examples on our work page and answers to common questions on the FAQ page.
Where we build entertainment units
We design, make and install entertainment units across Sydney, including apartments where we arrange lift bookings and work within strata rules.
- North Shore Mosman, Chatswood, Lane Cove, Wahroonga, Willoughby, Cremorne
- Eastern Suburbs Bondi, Bellevue Hill, Vaucluse, Double Bay, Woollahra, Randwick
- Inner West Balmain, Rozelle, Newtown, Marrickville, Summer Hill, Leichhardt
- Northern Beaches Manly, Freshwater, Seaforth, Dee Why, Balgowlah, Avalon
- Hills District Castle Hill, Kellyville, Bella Vista, Baulkham Hills, Rouse Hill
- Sydney CBD & Inner South Sydney CBD, Surry Hills, Zetland, Alexandria, Waterloo